
- This guide assumes you’re running commands as a user with sudo privileges.
🧰 Prerequisites
- Debian 12 installed
- Root or a user with sudo privileges
- Terminal access
1️⃣ Update Your System via command
root@frhb95653flex:~# apt update
2️⃣ Install Apache
root@frhb95653flex:~# apt install apache2 -y– Enable and Start Apache
root@frhb95653flex:~# systemctl enable apache2
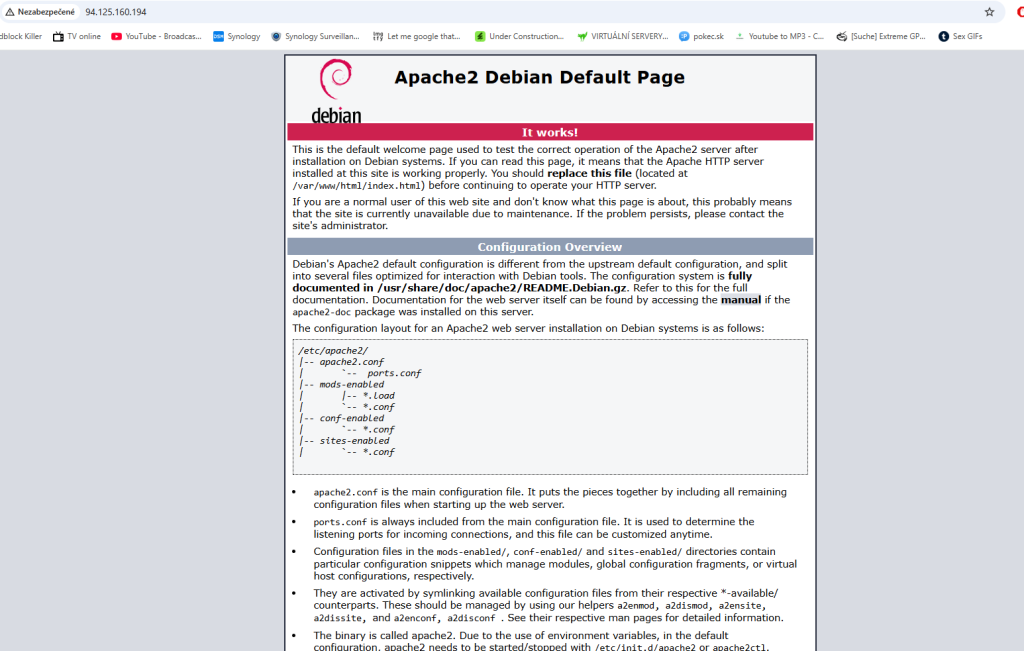
root@frhb95653flex:~# systemctl start apache2Open your browser and go to http://your_server_ip/
You should see the Apache2 Debian Default Page.
3️⃣ Install PHP and extensions
root@frhb95653flex:~# apt install php libapache2-mod-php php-mysql -y

root@frhb95653flex:~# apt install php-cli php-curl php-gd php-mbstring php-xml php-zip -y
4️⃣ Download and install MySQL Server (Check latest version here)
root@frhb95653flex:~# apt install gnupg
root@frhb95653flex:~# wget https://dev.mysql.com/get/mysql-apt-config_0.8.34-1_all.deb
root@frhb95653flex:~# dpkg -i mysql-apt-config_0.8.34-1_all.deb

- Reply to the following MySQL repository set up script prompts to install the latest database server sources. Keep MySQL Server & Cluster selected, choose the latest version — in this case, 8.4-fpm — and confirm the next dialog by clicking OK.
┌────────────────┤ Configuring mysql-apt-config ├─────────────────┐
│ Which MySQL product do you wish to configure?                   │
│                                                                 │
│     MySQL Server & Cluster (Currently selected: mysql-8.4-fpm)  │
│     MySQL Tools & Connectors (Currently selected: Enabled)      │
│     MySQL Preview Packages (Currently selected: Disabled)       │
│     Ok                                                          │
│                                                                 │
│                                                                 │
│                             <Ok>                                │
│                                                                 │
└─────────────────────────────────────────────────────────────────┘
– Update the server’s package and install the MySQL database.
root@frhb95653flex:~# apt update
root@frhb95653flex:~# apt install mysql-server
– Select strong password!!!
Enter root password:
Re-enter root password:
– View the installed MySQL version
root@frhb95653flex:~# mysql --version
mysql  Ver 8.4.5 for Linux on x86_64 (MySQL Community Server - GPL)
-Manage the MySQL System Service
- Enable the MySQL database server to automatically start at boot
root@frhb95653flex:~# systemctl enable mysql2. Start the MySQL database server.
root@frhb95653flex:~# systemctl start mysql3. View the MySQL system service status and verify that it’s running.
root@frhb95653flex:~# systemctl status mysql
● mysql.service - MySQL Community Server
     Loaded: loaded (/lib/systemd/system/mysql.service; enabled; preset: enabled)
     Active: active (running) since Sat 2025-05-17 15:46:46 UTC; 5min ago
       Docs: man:mysqld(8)
             http://dev.mysql.com/doc/refman/en/using-systemd.html
   Main PID: 13316 (mysqld)
     Status: "Server is operational"
      Tasks: 34 (limit: 2314)
     Memory: 469.9M
        CPU: 1.045s
     CGroup: /system.slice/mysql.service
             └─13316 /usr/sbin/mysqld
-Secure the MySQL Database Server
sudo mysql_secure_installation-Reply to the following MySQL prompts to secure your database server.
Securing the MySQL server deployment.
Enter password for user root:
-Enter Y and press Enter to enable the VALIDATE PASSWORD COMPONENT and ensure strict password security policies.
Would you like to setup VALIDATE PASSWORD component?
Press y|Y for Yes, any other key for No:
-Set your desired MySQL database server password strength policy. For example, enter 2 and press Enter to enable the use of strong passwords on your server
LOW    Length >= 8
MEDIUM Length >= 8, numeric, mixed case, and special characters
STRONG Length >= 8, numeric, mixed case, special characters and dictionary file

Please enter 0 = LOW, 1 = MEDIUM and 2 = STRONG: 2
-Enter N when prompted to change the root database user password, or enter Y to change the password.
Change the password for root ? ((Press y|Y for Yes, any other key for No) :-Enter Y and press Enter when prompted to remove anonymous users on the database server.
Remove anonymous users? (Press y|Y for Yes, any other key for No) :-Enter Y and press Enter to disable remote access to the root database user.
Disallow root login remotely? (Press y|Y for Yes, any other key for No) :-Enter Y and press Enter to remove the test database on your server.
Remove test database and access to it? (Press y|Y for Yes, any other key for No) :-Enter Y and press Enter to update the MySQL privileges table and apply your configuration changes.
Reload privilege tables now? (Press y|Y for Yes, any other key for No) :All done
🔐 Step 8: Install Let’s Encrypt (Certbot) for Apache
Install Certbot and Apache plugin
root@frhb95653flex:~# apt install certbot python3-certbot-apache -yGet SSL Certificate – Replace yourdomain.com with your actual domain name:
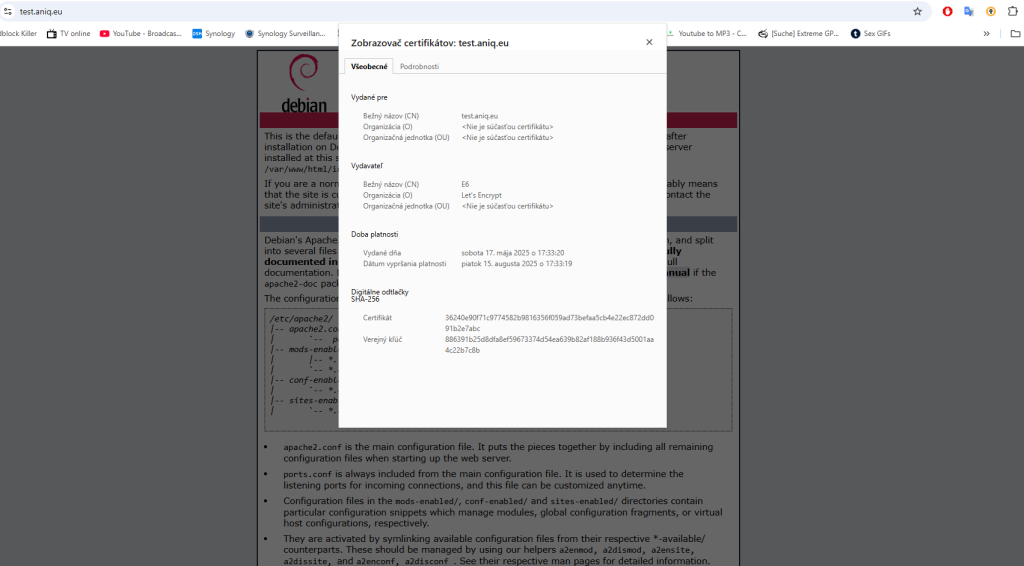
root@frhb95653flex:~# sudo certbot --apache -d test.aniq.eu -d www.test.aniq.euSuccessfully received certificate.
Certificate is saved at: /etc/letsencrypt/live/test.aniq.eu/fullchain.pem
Key is saved at: /etc/letsencrypt/live/test.aniq.eu/privkey.pem
This certificate expires on 2025-08-15.
These files will be updated when the certificate renews.
Certbot has set up a scheduled task to automatically renew this certificate in the background.
Deploying certificate
Successfully deployed certificate for test.aniq.eu to /etc/apache2/sites-available/000-default-le-ssl.conf
We were unable to find a vhost with a ServerName or Address of www.test.aniq.eu.
Which virtual host would you like to choose?
- - - - - - - - - - - - - - - - - - - - - - - - - - - - - - - - - - - - - - - -
1: 000-default.conf | | | Enabled
2: 000-default-le-ssl.conf | test.aniq.eu | HTTPS | Enabled
- - - - - - - - - - - - - - - - - - - - - - - - - - - - - - - - - - - - - - - -
Select the appropriate number [1-2] then [enter] (press 'c' to cancel): 2
Successfully deployed certificate for www.test.aniq.eu to /etc/apache2/sites-available/000-default-le-ssl.conf
Congratulations! You have successfully enabled HTTPS on https://test.aniq.eu and https://www.test.aniq.eu
- - - - - - - - - - - - - - - - - - - - - - - - - - - - - - - - - - - - - - - -
If you like Certbot, please consider supporting our work by:
* Donating to ISRG / Let's Encrypt: https://letsencrypt.org/donate
* Donating to EFF: https://eff.org/donate-le
- - - - - - - - - - - - - - - - - - - - - - - - - - - - - - - - - - - - - - - --During the process, Certbot will:
- Ask for your email (for renewal notices)
- Ask you to agree to the terms of service
- Optionally subscribe to EFF news
- Offer to redirect HTTP → HTTPS (choose redirect for full HTTPS)
-Test HTTPS open https://yourdomain.com
-Automatic Renewal, Certbot sets up automatic renewal via systemd. You can test it with:
sudo certbot renew --dry-run✅ Summary of Added Step:
- Installed Certbot for Apache
- Generated and applied a Let’s Encrypt SSL cert
- HTTPS is now working
- Auto-renewal is configured
In the following article, you will learn how to install phpMyAdmin to simplify working with your database.
Sources: vultr.com, askubuntu.com
1 thought on “Installation and configuration of a web server with PHP, MySQL, and HTTPS (SSL) support using Let’s Encrypt. (Debian 12)”