Vaultwarden Docker installation with Apache HTTPS is a complete guide to deploy a secure self-hosted password manager. In this tutorial, we will install Vaultwarden using Docker, configure Apache reverse proxy, and secure the system with Let’s Encrypt SSL certificates.
1. Create project folder
mkdir vaultwarden

cd vaultwarden
2. Create docker-compose.yml
nano docker-compose.ymlPaste:
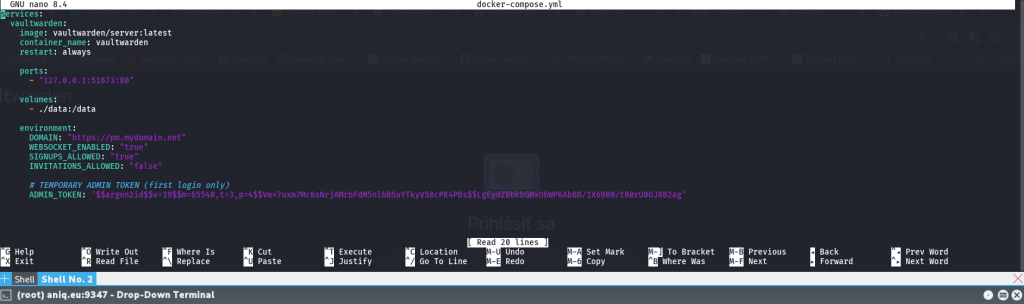
services:
  vaultwarden:
    image: vaultwarden/server:latest
    container_name: vaultwarden
    restart: always

    ports:
      - "127.0.0.1:51673:80"

    volumes:
      - ./data:/data

    environment:
      DOMAIN: "https://pm.mydomain.net"
      WEBSOCKET_ENABLED: "true"
      SIGNUPS_ALLOWED: "true"
      INVITATIONS_ALLOWED: "false"

      # TEMPORARY ADMIN TOKEN (first login only)
      ADMIN_TOKEN: "H/MmpSiKBrhlRPqMQqfQKz1b/OeYSSxxDwHpcowOKOKAXKXQtXxBximREky8jhm3tvaYr2SLNocpqXmX3T/wPg=="
Save:
- CTRL + X
- Y
- ENTER
3. Start Vaultwarden
docker compose up -dOpen:
http://127.0.0.1:51673Admin panel:
http://127.0.0.1:51673/adminLogin with temporary token.
4. Generate NEW admin password
Generate secure token:
openssl rand -base64 64⚠️ IMPORTANT:
Copy the output as ONE SINGLE LINE (no spaces, no line breaks).
Example:
DLeimBkDHccaadHqXguwpVr2/MV5KbIPDfsGJILQk5QOz0tbOzQjWszER+DZZxoPK5. Generate Argon2 hash
Run inside container:
docker exec -it vaultwarden /vaultwarden hashPaste the token twice when asked.
You will get output like:
$argon2id$v=19$m=65540,t=3,p=4$....6. Replace ADMIN_TOKEN (IMPORTANT)
Now open compose file:
nano docker-compose.yml👉 Replace your ADMIN_TOKEN like this:
You must copy your generated hash:
✔️ **from the first quote ‘
✔️ to the last quote ‘
Example replacement:
ADMIN_TOKEN: '$argon2id$v=19$m=65540,t=3,p=4$4O+biUKlSQ9Lznn+ssgyruv+vh3VVBFRi/wjio4VXAk$M0/zOGxkJzsQaHNj4BIl+Ee3D1ZSFYhquNFV9EhYbL4'⚠️ IMPORTANT NOTES:
- Copy entire hash exactly between quotes
- do NOT add spaces or new lines
- do NOT modify
$yet
Save file:
- CTRL + X
- Y
- ENTER
7. Escape $ for Docker Compose
Now convert all $ → $$ automatically:
sed -i 's/\$/\$\$/g' docker-compose.yml8. Restart Vaultwarden
docker compose up -d9. Install HTTPS (Let’s Encrypt + Apache setup)
Before enabling HTTPS for Vaultwarden, make sure your domain is correctly pointing to your server.
9.1 Install Certbot
Install Let’s Encrypt client:
apt install certbot python3-certbot-apache -y9.2 Ensure DNS is correctly set
In your domain provider:
A record:
pm.mydomain.net → YOUR_PUBLIC_IP
Wait until DNS propagates.
9.3 Enable Apache required modules
Run:
a2enmod proxy proxy_http proxy_wstunnel ssl rewrite headers9.4 Create Apache site config
Create configuration file:
nano /etc/apache2/sites-available/vaultwarden.confPaste your config: EDIT mydomain
<VirtualHost *:80>
    ServerName pm.mydomain.net

    RewriteEngine On
    RewriteCond %{HTTPS} !=on
    RewriteRule ^/?(.*) https://%{SERVER_NAME}/$1 [R=301,L]
</VirtualHost>

<VirtualHost *:443>
    ServerName pm.mydomain.net

    SSLEngine on
    SSLCertificateFile /etc/letsencrypt/live/pm.mydomain.net/fullchain.pem
    SSLCertificateKeyFile /etc/letsencrypt/live/pm.mydomain.net/privkey.pem
    Include /etc/letsencrypt/options-ssl-apache.conf

    ProxyPreserveHost On
    ProxyRequests Off

    # WebSockets (important for Vaultwarden)
    ProxyPass /notifications/ ws://127.0.0.1:51673/notifications/ retry=0
    ProxyPassReverse /notifications/ ws://127.0.0.1:51673/notifications/

    # Main Vaultwarden proxy
    ProxyPass / http://127.0.0.1:51673/
    ProxyPassReverse / http://127.0.0.1:51673/

    # Correct headers
    RequestHeader set X-Forwarded-Proto "https"
    RequestHeader set X-Real-IP "%{REMOTE_ADDR}s"
    RequestHeader set X-Forwarded-For "%{REMOTE_ADDR}s"

    # Security: block wrong host access
    <If "%{HTTP_HOST} != 'pm.mydomain.net'">
        Redirect 403 /
    </If>
</VirtualHost>
Save:
- CTRL + X
- Y
- ENTER
9.5 Enable the site (IMPORTANT STEP)
Activate configuration:
a2ensite vaultwarden.confCheck if enabled:
ls /etc/apache2/sites-enabled/You should see:
vaultwarden.conf9.6 Test Apache config
Before restarting:
apache2ctl configtestExpected output:
Syntax OK9.7 Restart Apache
Apply changes:
systemctl reload apache29.8 Generate SSL certificate
Now run Certbot:
certbot --apache -d pm.mydomain.netCertbot will:
- automatically enable HTTPS
- attach SSL to your
.conf - modify Apache VirtualHost if needed
9.9 Final check
Open browser:
https://pm.mydomain.netYou should see Vaultwarden running securely over HTTPS.
Admin panel:
https://pm.mydomain.net/admin